https://www.youtube.com/watch?v=hGuUFVZ_tSs&list=PL7ZVZgsnLwEEoHQAElEPg7l7T6nt25I3N&index=8
https://colab.research.google.com/drive/1PELxaO_9Pzov6svb0LlVLtCkNlTb_dFi?usp=sharing
_8 순환 신경망(Recurrent Neural Network).ipynb
Colaboratory notebook
colab.research.google.com
순환 신경망 (Recurrent Neural Network, RNN)
- 순서가 있는 데이터를 입력으로 받음
- 변화하는 입력에 대한 출력을 얻음
- 시계열(날씨, 주가 등), 자연어와 같이 시간의 흐름에 따라 변화하고, 그 변화가 의미를 갖는 데이터
Feed Forward Network vs Recurrent Network
- Feed Forward Net (앞먹임 구조)
- 일반적인 구조의 신경망
- 입력 → 은닉 → 출력층 으로 이어지는 단방향 구조
- 이전 스텝의 출력의 영향을 받지 않음
- Recurrent Net (되먹임 구조)
- 이전 층(Layer), 또는 스텝의 출력이 다시 입력으로 연결되는 신경망 구조
- 각 스텝마다 이전 상태를 기억 시스템(Memory System)
- 현재 상태가 이전 상태에 종속
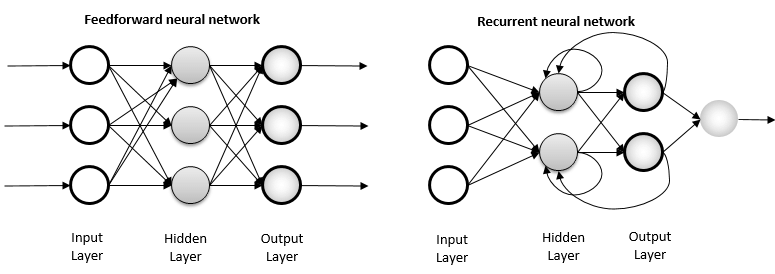
출처: https://www.researchgate.net/figure/Feed-forward-and-recurrent-ANN-architecture_fig1_315111480
Figure 1. Feed forward and recurrent ANN architecture.
Download scientific diagram | Feed forward and recurrent ANN architecture. from publication: A COMPREHENSIVE REVIEW FOR ARTIFICAL NEURAL NETWORK APPLICATION TO PUBLIC TRANSPORTATION | This paper presents a comprehensive review of research studies relate
www.researchgate.net
순환 신경망 구조

- 입력 xt에서 t는 시각을 뜻함
- X0에 대한 출력 Y0이 다음 레이어에 전달
- 각각의 입력에 대해 출력은 해당 레이어대로 출력값을 반환
순환 신경망의 다양한 구조

Building a Recurrent Neural Network | Neural Networks with Keras Cookbook
www.prod.packt.com
- one to one : 입력 1, 출력 1개
- RNN
- one to many : 입력 1, 출력 여러 개
- Image Captioning
- 이미지에 대한 설명 생성
- many to one : 입력 여러 개, 출력 1개
- Sentiment Classification
- 문장의 긍정/부정을 판단하는 감정 분석
- many to many : 입력 여러 개, 출력 여러 개
- Machine Translation
- 하나의 언어를 다른 언어로 번역하는 기계 번역
- many to many : 동일한, 고정된 형태의 many to many
- Video Classification(Frame Level)
두 가지 정보(현재 입력, 이전 시각의 출력)을 처리하는 수식

Understanding LSTM Networks -- colah's blog
Posted on August 27, 2015 <!-- by colah --> Humans don’t start their thinking from scratch every second. As you read this essay, you understand each word based on your understanding of previous words. You don’t throw everything away and start thinking
colah.github.io
순환 신경망 레이어 (RNN Layer)
- 입력: (timesteps, input_features)
- 출력: (timesteps, output_features)
import numpy as np

timesteps = 100
input_features = 32
output_features = 64

inputs = np.random.random((timesteps, input_features))

state_t = np.zeros((output_features, ))


W = np.random.random((output_features, input_features))
U = np.random.random((output_features, output_features))
b = np.random.random((output_features, ))


sucessive_outputs = []

for input_t in inputs:
    output_t = np.tanh(np.dot(W, input_t) + np.dot(U, state_t) + b)
    sucessive_outputs.append(output_t)
    state_t = output_t

final_output_sequence = np.stack(sucessive_outputs, axis = 0)
케라스의 순환층
케라스에서 이미 RNN 층을 설계해놓고 제공해주고 잇따! 호뤠이!
- SimpleRNN layer
- 입력: (batch_size, timesteps, input_features)
- 출력
- return_sequences로 결정할 수 있음 (다음 입력으로 출력을 줄지 True False로 결정가능)
- 3D 텐서
- 타임스텝의 출력을 모은 전체 시퀀스를 반환
- (batch_size, timesteps, output_features)
- 2D 텐서
- 입력 시퀀스에 대한 마지막 출력만 반환
- (batch_size, output_features)
# 케라스에서 RNN 사용하기
from tensorflow.keras.layers import SimpleRNN, Embedding
from tensorflow.keras.models import Sequential

# return_sequence=False (디폴트)
model = Sequential()
model.add(Embedding(10000, 32))
model.add(SimpleRNN(32))
model.summary()

# return_sequence=True
model = Sequential()
model.add(Embedding(10000, 32))
model.add(SimpleRNN(32, return_sequences=True))
model.summary()
- 네트워크의 표현력을 증가시키기 위해 여러 개의 순환층을 차례대로 쌓는 것이 유용할 때가 있음
- 이런 설정에서는 중간층들이 전체 출력 시퀀스를 반환하도록 설정
# 순환층 추가하기
model = Sequential()
model.add(Embedding(10000, 32))
model.add(SimpleRNN(32, return_sequences=True))
model.add(SimpleRNN(32, return_sequences=True))
model.add(SimpleRNN(32, return_sequences=True))
model.add(SimpleRNN(32, return_sequences=True))
model.add(SimpleRNN(32)) # 마지막의 경우 이 출력 입력으로 넣을 층이 없넹!
model.summary()
IMDB 데이터 적용
데이터 로드
# 데이터 로드
from tensorflow.keras.datasets import imdb
from tensorflow.keras.preprocessing import sequence

num_words = 10000
max_len = 500
batch_size = 32

(input_train, y_train), (input_test, y_test) = imdb.load_data(num_words=num_words)
print(len(input_train), len(input_test))

# 패딩 추가해주기! 길이 일정하게 맞춰주자
input_train = sequence.pad_sequences(input_train, maxlen = max_len)
input_test = sequence.pad_sequences(input_test, maxlen = max_len)
print(input_train.shape, input_test.shape)
모델 구성
# 모델 구성
from tensorflow.keras.layers import Dense

model = Sequential()

model.add(Embedding(num_words, 32))
model.add(SimpleRNN(32))
model.add(Dense(1, activation='sigmoid'))

model.compile(optimizer='rmsprop', loss='binary_crossentropy', metrics=['acc'])
model.summary()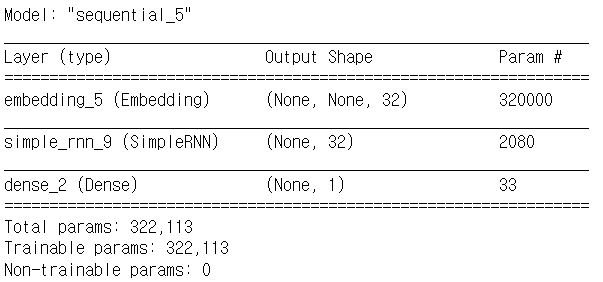
모델 학습
# 모델 학습
history = model.fit(input_train, y_train, epochs=10, batch_size=128, validation_split=0.2)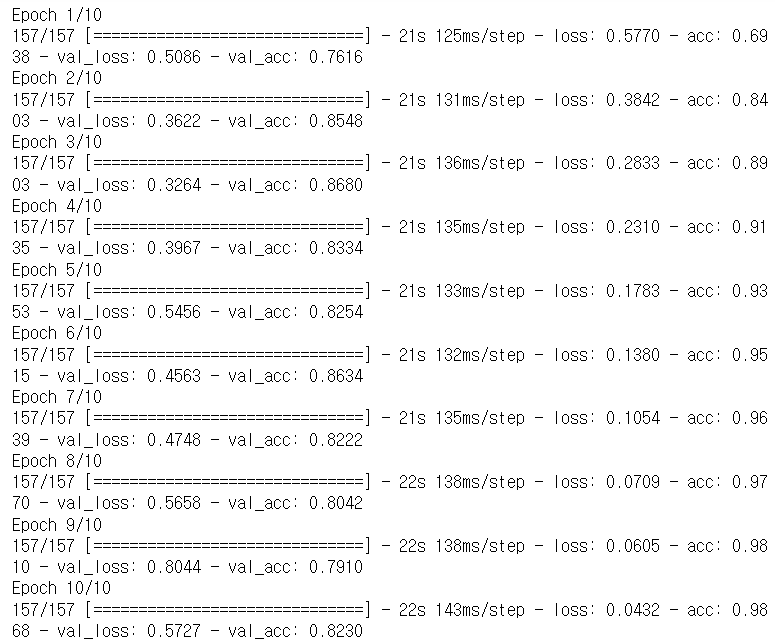
시각화
# 모델 학습 시각화
import matplotlib.pyplot as plt
plt.style.use('seaborn-white')

loss = history.history['loss']
val_loss = history.history['val_loss']
acc = history.history['acc']
val_acc = history.history['val_acc']

epochs = range(1, len(loss) + 1)

plt.plot(epochs, loss, 'b--', label='training loss')
plt.plot(epochs, val_loss, 'r:', label='validation loss')
plt.grid()
plt.legend()

plt.figure()
plt.plot(epochs, acc, 'b--', label='training accuracy')
plt.plot(epochs, val_acc, 'r:', label='validation accuracy')
plt.grid()
plt.legend()
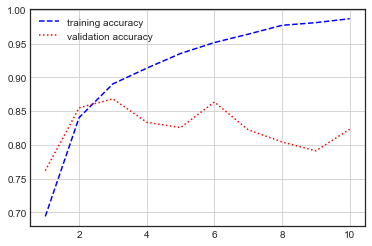
모델 평가
model.evaluate(input_test, y_test) # [0.5901410579681396, 0.819599986076355]
- 전체 시퀀스가 아니라 순서대로 500개의 단어만 입력했기 때문에 성능이 낮게 나옴
- SimpleRNN은 긴 시퀀스를 처리하는데 적합하지 않음
- SimpleRNN은 실전에 사용하기엔 너무 단순
- SimpleRNN은 이론적으로 시간 t 에서 이전의 모든 타임스텝의 정보를 유지할 수 있지만, 실제로는 긴 시간에 걸친 의존성은 학습할 수 없음
- 그래디언트 소실 문제(vanishing gradient problem)
- 이를 방지하기 위해 LSTM, GRU 같은 레이어 등장
LSTM(Long Short-Term Memory)
- 장단기 메모리 알고리즘
- 나중을 위해 정보를 저장함으로써 오래된 시그널이 점차 소실되는 것을 막아줌
- 출처: https://colah.github.io/posts/2015-08-Understanding-LSTMs/
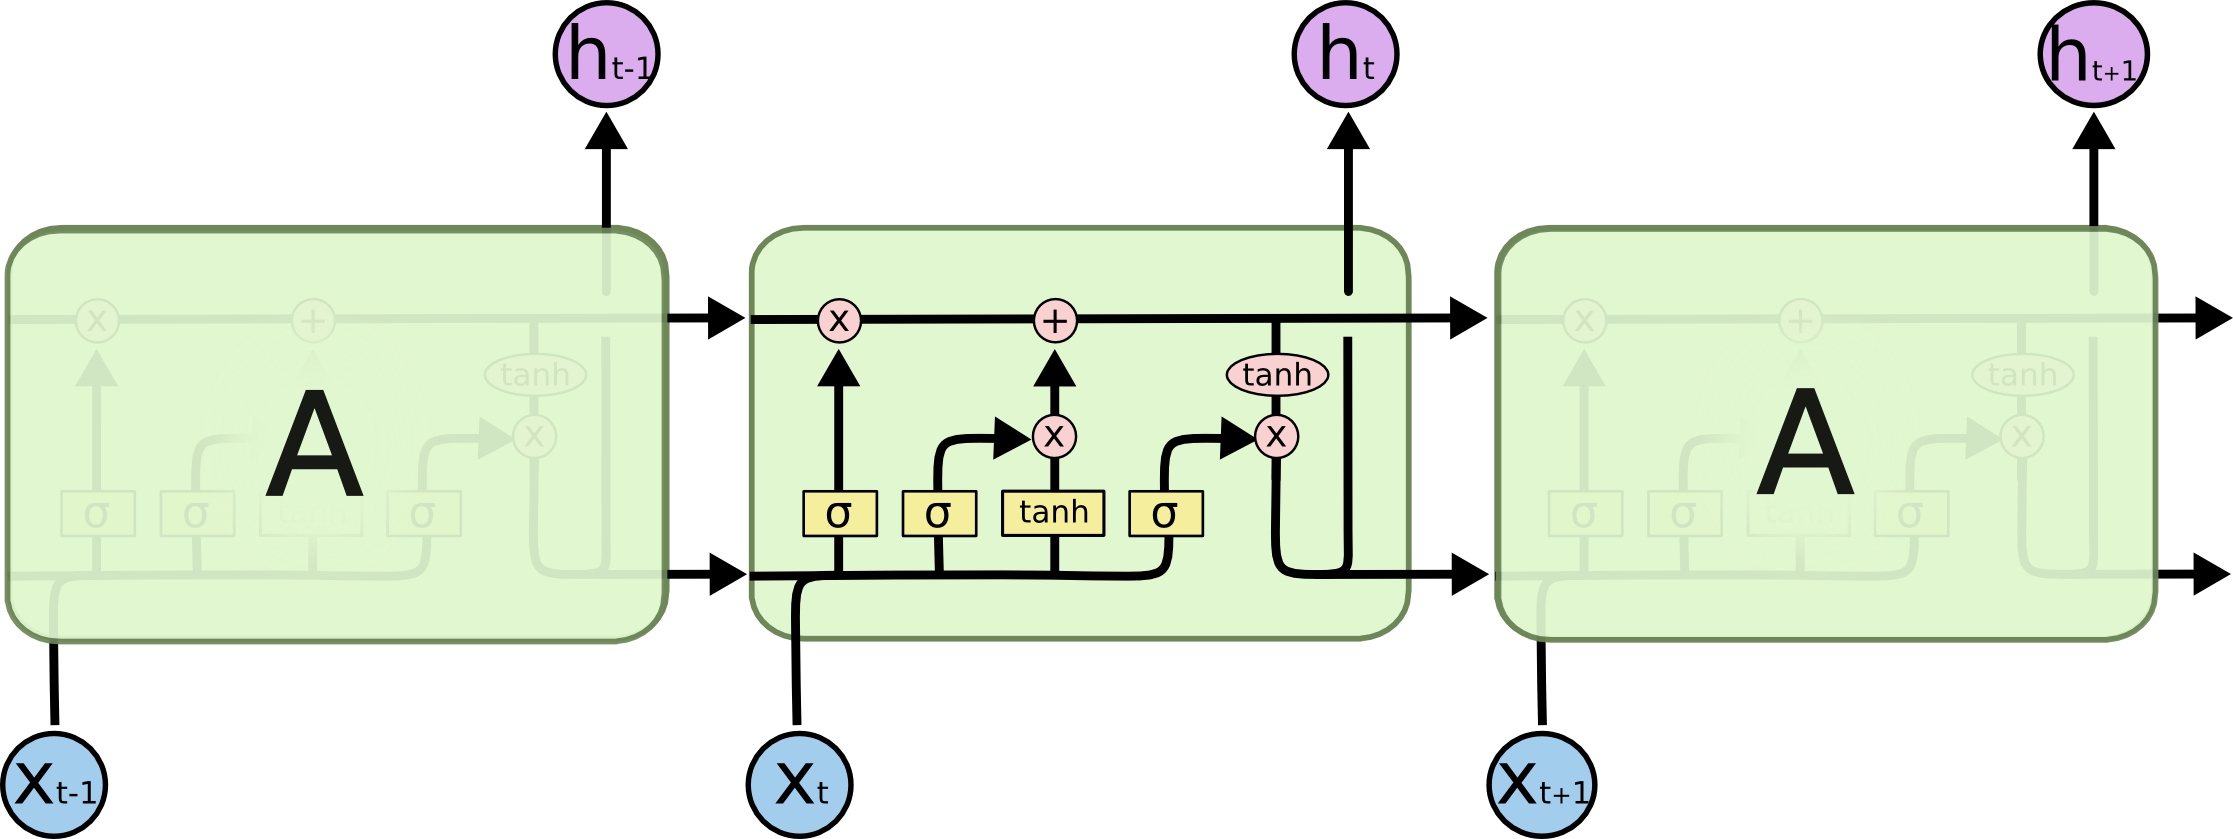
Understanding LSTM Networks -- colah's blog
Posted on August 27, 2015 <!-- by colah --> Humans don’t start their thinking from scratch every second. As you read this essay, you understand each word based on your understanding of previous words. You don’t throw everything away and start thinking
colah.github.io
장기적으로 유지를 시킬 것과 소실을 시킬 것을 나눠서 처리한다!
IMDB 데이터 적용
데이터 로드
# 데이터 로드
from tensorflow.keras.datasets import imdb
from tensorflow.keras.preprocessing import sequence

num_words = 10000
max_len = 500
batch_size = 32

(input_train, y_train), (input_test, y_test) = imdb.load_data(num_words=num_words)
print(len(input_train), len(input_test))

# 패딩 추가해주기! 길이 일정하게 맞춰주자
input_train = sequence.pad_sequences(input_train, maxlen = max_len)
input_test = sequence.pad_sequences(input_test, maxlen = max_len)
print(input_train.shape, input_test.shape)
모델 구성
# 모델 구성
from tensorflow.keras.models import Sequential
from tensorflow.keras.layers import Dense, LSTM, GRU, Embedding

model = Sequential()

model.add(Embedding(num_words, 32))
model.add(LSTM(32))
model.add(Dense(1, activation='sigmoid'))

model.compile(optimizer='rmsprop', loss='binary_crossentropy', metrics=['acc'])
model.summary()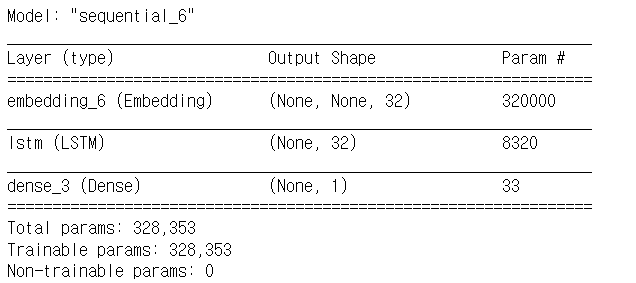
모델 학습
# 모델 학습
history = model.fit(input_train, y_train, epochs=10, batch_size=128, validation_split=0.2)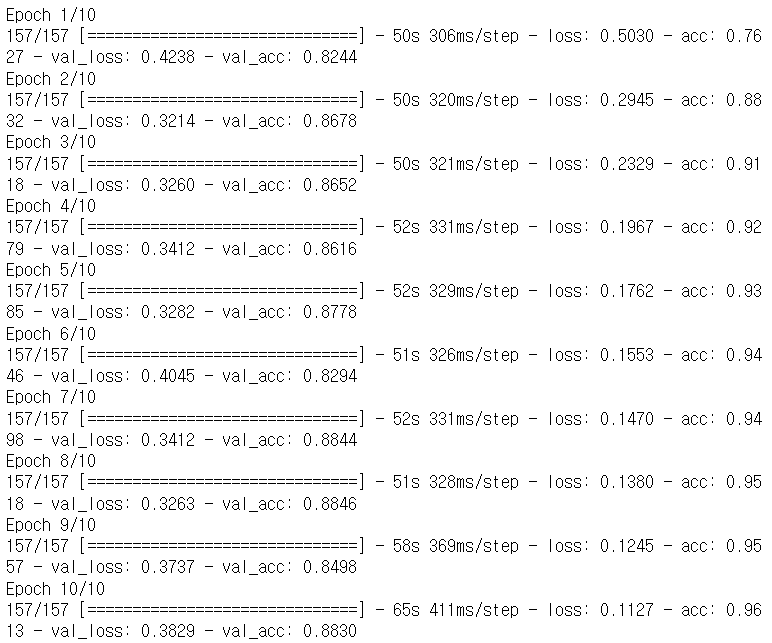
시각화
# 모델 학습 시각화
import matplotlib.pyplot as plt
plt.style.use('seaborn-white')

loss = history.history['loss']
val_loss = history.history['val_loss']
acc = history.history['acc']
val_acc = history.history['val_acc']

epochs = range(1, len(loss) + 1)

plt.plot(epochs, loss, 'b--', label='training loss')
plt.plot(epochs, val_loss, 'r:', label='validation loss')
plt.grid()
plt.legend()

plt.figure()
plt.plot(epochs, acc, 'b--', label='training accuracy')
plt.plot(epochs, val_acc, 'r:', label='validation accuracy')
plt.grid()
plt.legend()

모델 평가
model.evaluate(input_test, y_test) # [0.4423943758010864, 0.866599977016449]GRU (Gated Recurrent Unit)
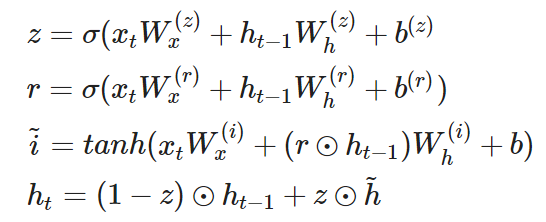
- LSTM을 더 단순하게 만든 구조
- 기억 셀은 없고, 시간방향으로 전파하는 것은 은닉 상태만 있음
- reset gate
- 과거의 은닉 상태를 얼마나 무시할지 결정
- r 값이 결정
- update gate
- 은닉 상태를 갱신하는 게이트
- LSTM의 forget, input gate 역할을 동시에 함
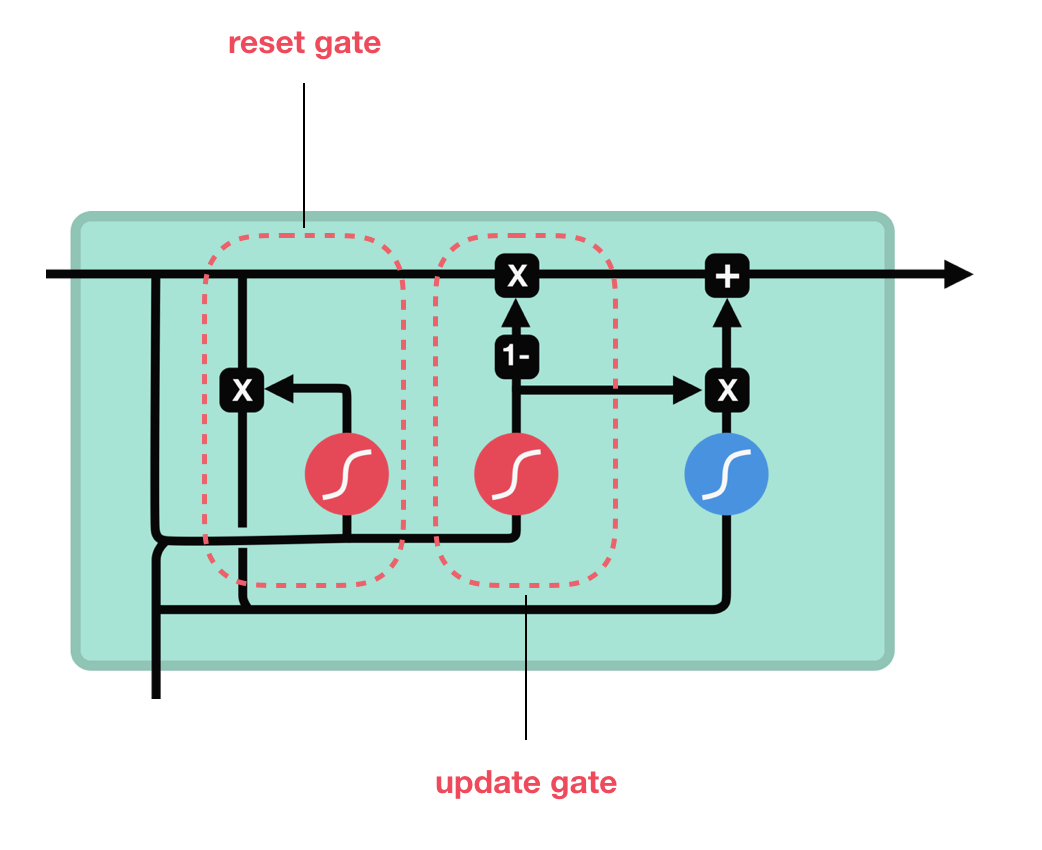
Illustrated Guide to LSTM’s and GRU’s: A step by step explanation
Hi and welcome to an Illustrated Guide to Long Short-Term Memory (LSTM) and Gated Recurrent Units (GRU). I’m Michael, and I’m a Machine…
towardsdatascience.com
Reuters 데이터
- IMDB와 유사한 데이터셋(텍스트 데이터) # 참고 : imdb는 이진분류만 하는 데이터셋이야!
- 46개의 상호 배타적인 토픽으로 이루어진 데이터셋
- 다중 분류 문제
데이터셋 로드
# reuters 데이터, GRU를 활용한 실습
from tensorflow.keras.datasets import reuters

num_words = 10000
(x_train, y_train), (x_test, y_test) = reuters.load_data(num_words=num_words)

print(x_train.shape, y_train.shape) # (8982,) (8982,)
print(x_test.shape, y_test.shape) # (2246,) (2246,)
데이터 전처리 및 확인
# 전처리: padding
from tensorflow.keras.preprocessing.sequence import pad_sequences

max_len = 300

pad_x_train = pad_sequences(x_train, maxlen = max_len)
pad_x_test = pad_sequences(x_test, maxlen = max_len)

print(len(x_train[0]), len(pad_x_train[0])) # 87 300
모델 구성
- LSTM 레이어도 SimpleRNN과 같이 return_sequences 인자 사용가능
# 모델 구성
from tensorflow.keras.models import Sequential
from tensorflow.keras.layers import GRU, Dense, Embedding

model = Sequential()
model.add(Embedding(input_dim=num_words, output_dim=256))
model.add(GRU(256, return_sequences=True))
model.add(GRU(128))
model.add(Dense(46,activation='softmax'))

model.compile(optimizer='adam', loss='sparse_categorical_crossentropy', metrics=['acc'])
model.summary()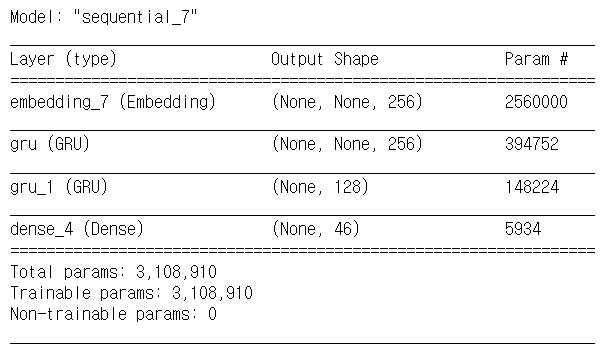
모델 학습
# 모델 학습
history = model.fit(pad_x_train, y_train, batch_size=32, epochs=20, validation_split=0.2)
한 10번째 epoch부터 validation accuracy가 슬금슬금.. 자리잡기 시작..
20번 돌리기 때문에 시간도 엄청 오래 걸렸는데,,ㅜㅜ
시각화
# 모델 학습 시각화
import matplotlib.pyplot as plt
plt.style.use('seaborn-white')

loss = history.history['loss']
val_loss = history.history['val_loss']
acc = history.history['acc']
val_acc = history.history['val_acc']

epochs = range(1, len(loss) + 1)

plt.plot(epochs, loss, 'b--', label='training loss')
plt.plot(epochs, val_loss, 'r:', label='validation loss')
plt.grid()
plt.legend()

plt.figure()
plt.plot(epochs, acc, 'b--', label='training accuracy')
plt.plot(epochs, val_acc, 'r:', label='validation accuracy')
plt.grid()
plt.legend()

모델 평가
model.evaluate(pad_x_test, y_test) # [1.9879940748214722, 0.6821014881134033]생각보다 훨씬 낮은 성능으로 마무리,,
다음에는 epoch 10으로 잡아두고 해야겠땅
'Computer > ML·DL·NLP' 카테고리의 다른 글
| [이수안컴퓨터연구소] 케라스 Word2Vec Skipgram, CBOW 구현 (0) | 2022.01.31 |
|---|---|
| [이수안컴퓨터연구소] 합성곱 신경망 Convolution Neural Network (0) | 2022.01.11 |
| [이수안컴퓨터연구소] 임베딩 Embedding (0) | 2022.01.08 |
| [이수안컴퓨터연구소] 토픽 모델링 Topic Modeling (0) | 2022.01.08 |
| [스크랩] XGBoost 뿌수기! (0) | 2021.10.25 |


댓글